Pieter Rijlaarsdam
Read all my blogsIn previous blogs on RTOM we have prepared the RTOM and CRM system to communicate with each other. This blog will focus on setting up an example and explain the functionality of solution.
Business scenario
 Let’s say we have 2 products and RTOM to advice us which one to cross-sell to the customer. For instance, if the user lives in the US, we should advise product A, but if he lives outside of the US we should advise product B.
Master Data setup
We will need to create two campaigns of the type RTOM offer. You can use the following fields to specify your requirements.
Purpose:
By selecting Product Offer, RTOM will return a product advice. If you select Message, RTOM will only sent a message to the IC agent.
Display Option:
Three options here: Always show, will always show the product advice (if valid). Show by default will only show if no offers are found with Show by Priority.
Priority:
When RTOM finds an offer with display option Show by Priority it will only show the offers with the highest priority.
Re-Offer After (n) Days:
RTOM will not offer the same product to the same customer in this time frame.
Planned Start and End date:
Specifies the validity period of an Offer
Status:
Status of the Campaign, needs to be released to go to RTOM.
Channel:
Here you can select Web and/or IC. The RTOM events are setup per channel. For standard IC scenario, check IC.
Business Goals:
Can be used to categorize the campaigns, this field will not be sent to RTOM.
Eligibilty:
The rule added here will be validated first by RTOM. No learning will be done on this rules.
Agent Skills:
Next the agent skills are validated. This rule can be used to for instance in you have products that require training to advice to a customer.
Recipient Profile:
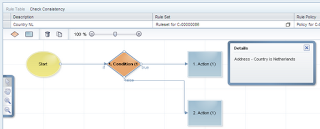
You can assign multiple recipient profiles, all with their own rule. In the suitability you can write a text explaining why the profile is appropriate for the customer. When selecting the profile rules a BRF+ rule editor is started. In below screenshot you see a rule for the country.
Related Campaigns:
If you link an existing Marketing Campaing with a target group. RTOM will offer the product only if the confirmed business partner is part of the Target Group.
Products:
Here you link the product that want to use in the advice.
For the example, we will need to create the following two campaigns.
Campaign 1
Purpose: Product Offer
Display Option: Always Show
Priority
Re-Offer After (n) Days: 10
Planned Start and End date: 01-01-2012 / 01-01-2014
Status: Released
Channel: IC
Business Goals
Eligibilty
Agent Skills
Recipient Profile: BP Country US
Related Campaigns
Products: Laptop A
Campaing 2
Purpose: Product Offer
Display Option: Always Show
Priority
Re-Offer After (n) Days: 10
Planned Start and End date: 01-01-2012 / 01-01-2014
Status: Released
Channel: IC
Business Goals
Eligibilty
Agent Skills
Recipient Profile: BP Country NON-US
Related Campaigns
Products: Laptop B
Publish Process
To get the campaign data to RTOM we need to run the Publish report in CRM.  This publish report will first check if there are still any previous publish reports that have not finished yet. It does so by checking table CRMD_RTOM_JOB and looking for the status. RTOM will update this status when all calls are finished. Keep in mind that during publishing there are no advises given by RTOM.
If the previous publish is finished it will check the table CRMD_RTOM_QUEUE to see if there any RTOM campaigns that need publishing. Every time you change a campaign it will create an entry in this table, this entry is removed after publishing.
The Publish report sends the campaign data to RTOM. RTOM will then trigger the data source web services to get all the details from CRM. The campaign data is not sent to RTOM but actually read by RTOM via the web service CAMPAIGNCRMBYIDQUERYRESPONSE_I. You can test this web service via SE80. The actual data is read afterwards with another web service call to CRM, crm_fdt_readrule_ws.
RTOM Toolkit
Now that the campaigns from CRM have become offers in RTOM we can take a look at the RTOM Toolkit. In the monitoring tab you can open the Job Log. Here you can check the status of the publish report. It will remain on the scheduled tab until it is completely finished (Including RTOM calls to CRM.)
On the Business Tool Tab we can view all the offers that were created in RTOM in the Business Logic Studio. Once an offer is in RTOM you can change it, but you cannot delete it.
To check if every thing is working you executed a test event on RTOM in the Simulator. Select for instance the event account confirmed and fill in a CRM BP Number. RTOM will now call CRM to check all BP data and validate our two campaigns. If this is successful we can start the process from CRM.
CRM Interaction Center
Now we can start the process from the Interaction Center. After we have found the customer and pushed confirm account we get a message from RTOM that 1 offer has been found, and the offer button will be blinking.
By clicking on the Offers button, a product proposal screen is shown. Here you can enter a quantity and add the product to the cart.
In the order we now use the ‘add from cart’ button to add the products.
Conclusion
Of course, the example as described here is very simple, and is based on predefined rules (customer inside US vs customer outside US). Of course, the real advantage of having RTOM is RTOM’s ability to learn about customer’s behaviour and create product proposals based on complex rules.
The past 3 blogs have been about how to implement RTOM technically and do a basic setup. It is now up to you to achieve the real benefits from RTOM.


One response to “Real Time Offer Management (RTOM) Functionality”
Hi Pieter,
I was able to set up RTOM but wasonly able to use the Customer Master data to generate offers. I could not use the condition groups like Session Customer and Agent, as all the xml data elements were appearing as "nil" in the RTOM tool kit. What could be the reason for this? Please let me know how these condition groups can be put to use
Aj