
Sandor van der Neut
Read all my blogsHow to integrate an SAPUI5 application into the SAP Web UI
Sandor van der Neut, 13 June 2018
Inspired by the open SAP course Maps and 3D Made Easy with SAPUI5, I decided to find some practical use for my newly gained knowledge.
As I still work a lot with the CRM SAP Web UI I thought it would be nice to have the possibility to show the location (or address) of a Business Partner on a geographic map by pressing a button on the Account Details screen.
To be able to pull this one off I made a list of things I had to take care of:
- Get a Map Provider Service
- Build a SAPUI5 application which shows a location based on geographic coordinates
- Upload my SAPUI5 application into the UI repository of the target system
- Integrate my SAPUI5 application into the SAP Web UI
- Test all this awesomeness
Quite an impressive list if I may say so myself so let’s get to it!
Get a Map Provider Service
In SAPUI5 you can display geographical maps using the GeoMap control, but to be able to do this you have to define a map provider service in your map configuration. Luckily map provider services are easy to come by and a quick search online will reveal there are a lot of different map providers available out there. You can choose from Google, Bing, MapBox, HERE Maps and many more. I myself decided to go for HERE Maps because it offers a 90 days trial account which you can use for developing and prototyping and that is exactly what I am doing here. After registering you will receive an Application Code and an Application ID which you use in your API calls.
Build an SAPUI5 application
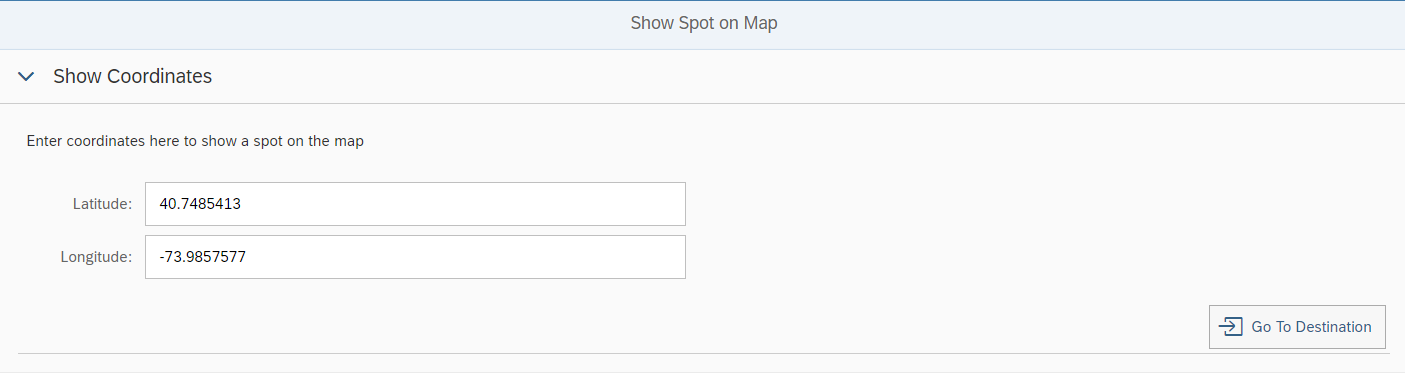
Because I didn’t want to over complicate things I created a simple SAPUI5 application in the SAP Web IDE which shows a location (spot) on a map based on its geographical coordinates ( also known as the latitude and the longitude ). Let me start with showing the end result before I dive a little deeper into the application itself. The application consist of a simple entry screen where you can enter the latitude and a longitude and a button to go to the entered destination.
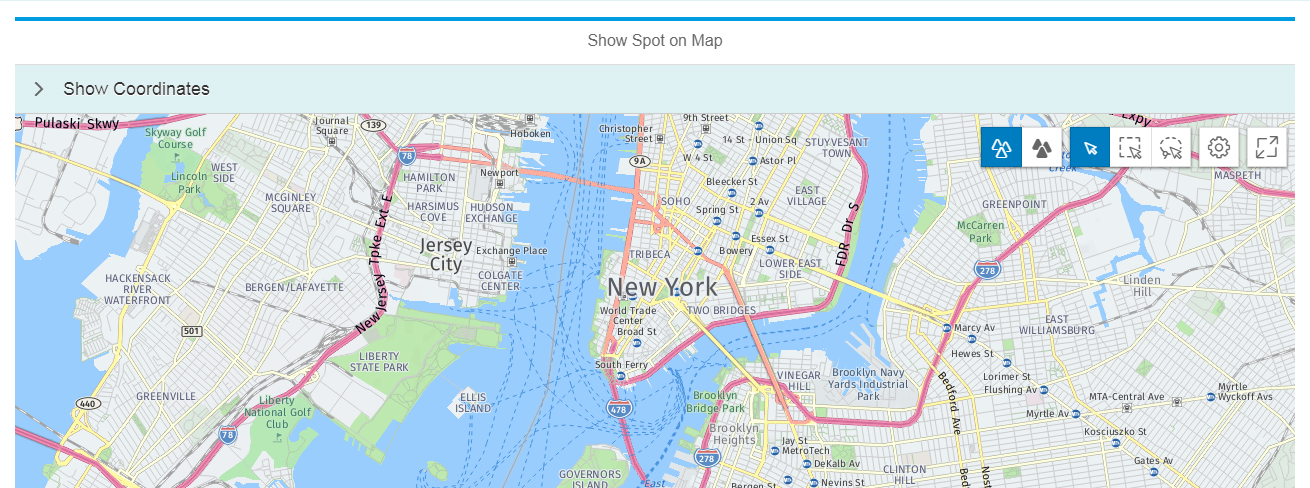
After entering the destination you can press the ‘Go To Destination’ button and you will navigate to the coordinates entered on the screen. The map also has an initial starting position which is shown when the application is started for the first time. In the example below we start from the ‘Big Apple’.

The map is displayed using the GeoMap control. The GeoMap Control resides inside a MapContainer where also a Spot is defined to pin point the exact location that has been selected. In the XML view it is defined as follows.

The map configuration itself with the connection to the map provider is defined in the onInit function of the view controller and here, amongst other things, the URL to the map provider service is defined.
Upload the application to the UI repository
Now that we have a working SAPUI5 application we have to deploy it to the SAPUI5 ABAP Repository of the target system. There is a possibility to do it directly from the Web IDE by choosing ‘Deploy’ and then choose ‘Deploy to SAPUI5 ABAP Repository’. But then you need a connection to your target system configured. In my situation that wasn’t the case so I used a different method to get the same result. I exported the application in the SAP Web IDE by choosing File -> Export. Then I logged on to the target system and ran the report ‘/UI5/UI5_REPOSITORY_LOAD’.

In the screen you enter the name of your SAPUI5 application and then let the program guide you through the rest of the steps. The end result of this exercise can be found in the Object Navigator (transaction SE80) as a BSP application with the name ZMAPPROVIDER.

To make sure everything works fine you can test the application and it should more or less look the same as the application you developed on the Web IDE. If the test fails please check in transaction SICF if the service has been activated.
Web UI Integration – SAP Web UI
With the application deployed to the SAPUI5 ABAP Repository we are now ready for the Web UI integration. But first let me explain how the Web UI component is being set up. The UI component will have the BuilHeader BOL entity in the Component controller context to which you can bind using component usage. The component will have a single view with a context node with the longitude and latitude of the address of the Business partner. This data will be retrieved from the GEOLOC table in SAP CRM. The longitude and latitude from this table will be passed to SAPUI5 application and bound to its model. This will ensure that the correct location will be shown by the map provider service every time the user pushes the button.
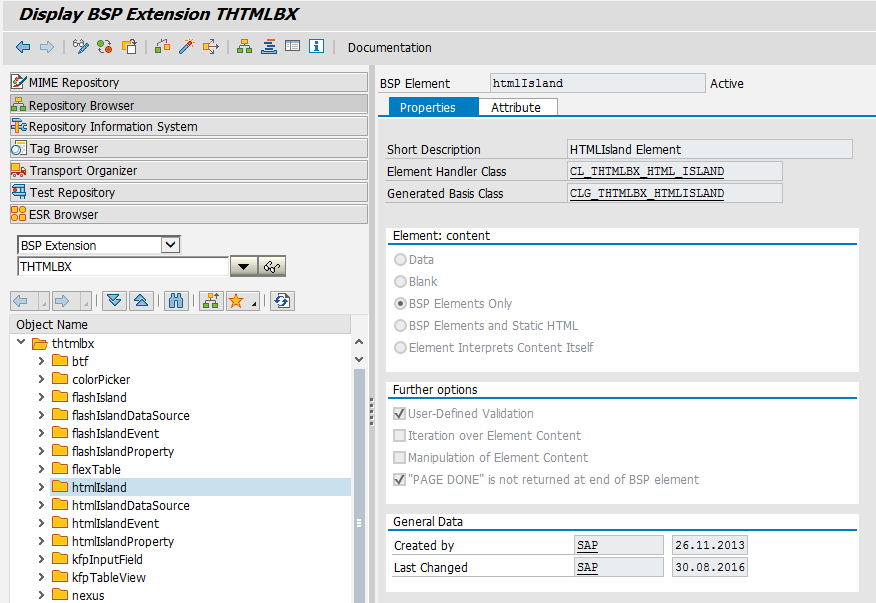
In earlier SAP releases you could have used an iFrame or something similar., but then you would have a lot of difficulty communicating the data between you Web UI component and your SAPUI5 application. However today we can make use of the HTMLIsland. It works as follows, the SAPUI5 application will be called from CRM through the HTML island. The HTML island will act as a bridge between the CRM BSP application and the SAPUI5 application. So that’s pretty cool and exactly what we need.
So let’s see what needs to be done to get it up and running. The first thing and actually the only thing you have to do in the Web UI, is add the HTMLIsland to your Web UI view and tell it which SAPUI5 application it will be calling and which properties you want to communicate to your SAPUI5 application. As can be seen in the example below.

The property htmlFile will contain the location of the index.html file of our SAPUI5 map provider application. Furthermore we set two properties ‘Latitude’ and ‘Longitude’ because we want to provide our map with some coordinates. The value of the properties are bound to the corresponding fields of the context node in our Web UI View. When needed you can also define an event that can be raised from your SAPUI5 application and can be handled in the CRM backend. We will not use it in this example but I just wanted to show that you have that possibility.
Web UI Integration – SAPUI5
With the Web UI part in place there is still quite some work to be done on the SAPUI5 application. We have to make sure that the HTML Island is able to talk to our SAPUI5 application. To do so some additional coding has to be done in the index.html file.
First you need to handle the domain relaxation. It’s a necessary piece of code you need to add if you are implementing JavaScript with inter-frame communication or inter-window communication. I don’t want to go into too much detail here but if you want find out more check this link.

The next piece of code is also quite essential and is necessary to include the HTML Island JavaScript library into you application.

Both are placed before the standard bootstrapping is done.
With this in place we have to define an Island Instance and register it. The Island Instance is an object with the Getter-/Setter-methods for the data to be passed between the inner and external/outer UI framework.
If we check the documentation of the registering method it tells us the following:
This method registers an object which will receive data from the Island Library, passed from the surrounding UI framework (e.g. CRM WebUIF). A call to this method is mandatory because in addition to registering the object it performs some other intialization routines, e.g. relaxes the domain, completes the handshake between Island Library and the outer UI framework. These initialization tasks are not done during the instantiation of this class because the receiving object may not yet be instantiated itself, separating this step out allows the Island to initialize what it needs (e.g. SAPUI5’s core framework) before starting the data transfer. However, it should be called as early as possible in the load of the page, for example in the HTML Body’s onload event handler.
With this in mind I defined an onBodyLoad function on the HTML body and added the following JavaScript code.

In the init method we do the actual registration of our object to the HTML Island library and we create the JSON model which will hold the coordinates.

And finally we define our Setter- / Getter-methods. It’s important here that the name of the property in the methods are exactly the same as the ones you defined in the HTMLIsland BSP extension earlier.

Basically this is all the coding that needs to be done but if you want more detailed information please take a look at the following SAP Note: 2361074 – HTML-Island-Integration in Web Client UI Framework
Put it all to the test
Now that everything is in place we are ready to implement our newly created ‘business partner locator’ and see if it actually works as we expected. In the Account Detail screen I defined a new button which when pressed will call the new UI component as a Pop-Up. Component usage is used to connect both UI components so that the business partner data is also available on our newly created application. As this is all really straightforward Web UI stuff I will not go in further detail here.
For demo purpose I created a new corporate account with its main address in the Royal Palace on the Dam Square in Amsterdam. The geographical coordinates for this address are stored in the GEOLOC table.

When I now push the ‘Show on Map’ button I expect these coordinates from the UI component to be passed on to the SAPUI5 application through the HTML Island. The SAPUI5 application will then pass these coordinates on to the map provider service.
See here the final result!

Succes!! It looks like we have hit the city center of Amsterdam. Let’s zoom in a bit so that we are 100% sure!
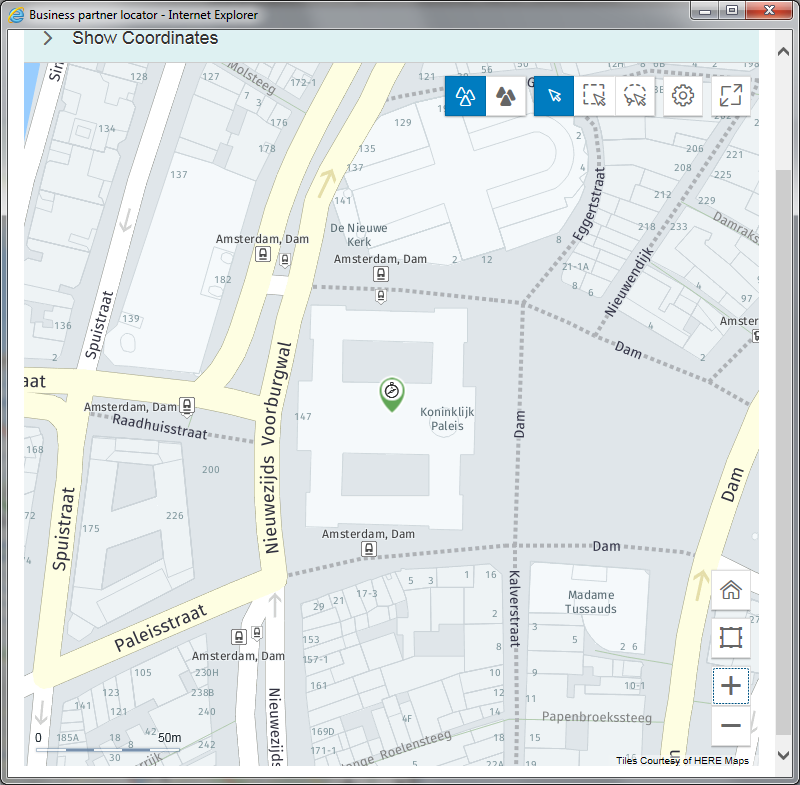
Right on the money! We landed our spot in the middle of the Royal Palace ( in dutch: ‘Koninklijk Paleis’). That’s is what we call spot on!
Conclusion
We have seen that by using the HTML Island BSP extension you are able to fully integrate a SAPUI5 application into the (CRM) Web UI. It supports data binding and allows you to handle events. It takes some effort to connect all the elements together but nothing too complicated in my opinion. I hope you enjoyed this blog, I surely enjoyed making it, and if you have any questions don’t hesitate to contact me.
Receive our weekly blog by email?
Subscribe here:

