Jelle Uenk
Read all my blogs5 Tips for Outlook Server-based integration with SAP Cloud for Customer
Jelle Uenk, 18 March 2020
Many organisations using SAP Cloud for Customer also use Microsoft Outlook as their primary E-mail tool. In this blog I want to share some tips based upon our experiences we have with implementing the groupware integration.
SAP provides two groupware integration tools for linking Microsoft Outlook to SAP Cloud for Customer: a client-based and a server-based add-in. Apart from the SAP provided integration tools, also several commercial implementations are available. Several blogs and help documents are available on the internet describing features, implementation and their differences.
In this blog I want to highlight a few aspects of the SAP server-based groupware integration, based on a recent implementation. After implementing, we noticed there are some features you should be aware of.
In our specific case, we decided we would not use automatic synchronisation of all emails and visits: several emails received in the user’s Outlook are not relevant for SAP Cloud for Customer, and we did not want to clutter SAP Cloud for Customer with non-relevant emails. Also, we wanted users to stay in control which mails and visits would end up in SAP Cloud for Customer, in order to have these linked to the correct object (like customer, contact, Opportunity) in SAP Cloud for Customer.
Tip 1: Check which system is leading…
When creating a visit in Outlook, the Outlook mail server (either Exchange or Office365) is the origin of the visit when synced to SAP Cloud for Customer. When you subsequently change the visit in Outlook (e.g. change the time or location), you will have to click on the button ‘Send update’ to inform the participants. This is also what the users will expect. However, when you update the visit in SAP Cloud for Customer directly (instead of in Outlook), SAP Cloud for Customer will update the visit in outlook at the next sync interval, then mail server will send the update automatically to the participants (without the user being informed and/or pressing the ‘Send update’ button). Similar behaviour is seen when the invite is created in SAP Cloud for Customer and synced back to Outlook.
Tip 2: Handling of rejections
When sending a visit from outlook, the list of recipients is visible in SAP Cloud for Customer as well in the ‘Attendees’ block. When a recipient rejects the invite, this is visible in Outlook in the tracking panel. Also, the item is removed in the recipients (Outlook) agenda. SAP Cloud for Customer does not support this tracking, and therefore is not informed about the rejection(s). In line with above tip 1, this implies that when the meeting date/time is shifted directly in SAP Cloud for Customer, the rejected recipients also will get all the updates of the meeting (and therefore the meeting again in their agenda), which can lead to confusion and questions. If you have an OSS ID, check this influence item.
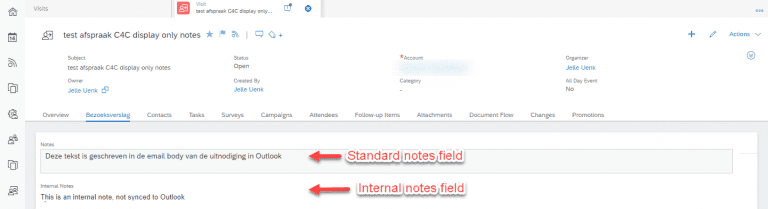
Tip 3: Handling of the mail body / notes field
The mail body of the visit invite in Outlook will be replicated into the Notes block. In the SAP Cloud for Customer Groupware Settings (tab Settings) you can specify whether the SAP Cloud for Customer Notes block will be kept in sync with the Outlook invite text or not, via the ‘Freeze Description Fields’ switch. If you do not activate this setting, any updates to the SAP Cloud for Customer Notes block is replicated back to the invite text in Outlook (and since this is seen as an update to the invite), also the initial recipients.

This is even more important since the notes section in SAP Cloud for Customer is also the logical place to store notes on the visit once executed – your personal visit notes could end up at the recipients if this setting is not managed correctly.
Tip 4: Use a separate key user field for internal notes
To prevent internal comments to end up at invite recipients, set up an additional key user field, e.g. called ‘Internal Notes’. This is not automatically part of the sync to Outlook/exchange, thereby providing a safe place for internal business comments.
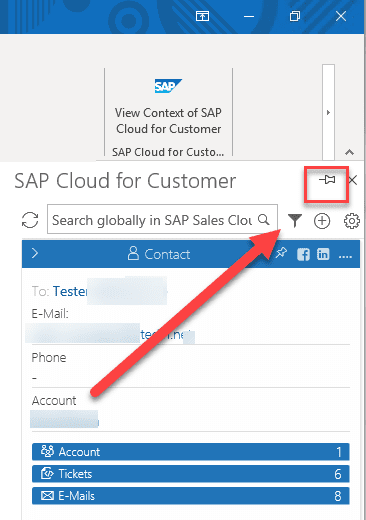
Tip 5: Pin the add-in to Outlook
This is especially interesting for users already using the outlook add-in for some time. Usually the add-in closed automatically when you switch to the next email. When using Office 365 and Outlook 2016 or higher, you can ‘pin’ the add-in to the main Outlook windows, so the add-in remains open when you click through the various emails in Outlook. This saves the user a few seconds waiting time per email.

Receive our weekly blog by email?
Subscribe here:

