
Thijs van Geel
Read all my blogsIn a previous blog “How SAP’s Perfect Store saves time and increases sales” my colleague already elaborated on the advantages of implementing a perfect store in SAP Sales Cloud. In short, he concluded that: Perfect Store visits are a great way to help your sales reps evaluate stores better by giving comparisons to previous visits and a direct insight in KPI`s and the Perfect Store gives access to extra data. This data can be useful for the business to gain better insight in their customers.
The advantages of the Perfect Store are clear. However, the setup might still raise some questions. Therefore, in this blog, I will show you how to implement the Perfect Store and explain how this new feature works in practice.
Getting perfect store in Scope
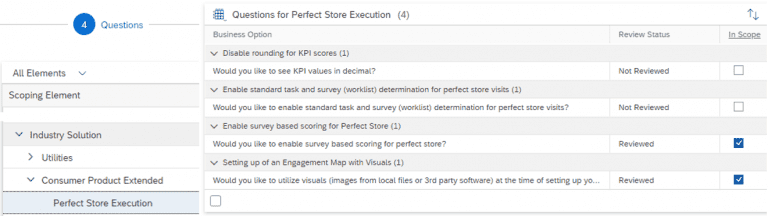
Prefect Store is not standard enabled in SAP Sales Cloud. To activate this, you will have to enable it within the scoping of your system. This can be done by navigating to Implementation Projects, editing the project scope, and enabling via Industry solutions > Consumer Product Extended > Perfect Store Execution.
Also review the scoping questions:
After Scoping, the Perfect Store is ready to be set up. You can now find two new Work Center views in the Activity planner Work Center. Namely: Points of Engagement and Engagement Maps.
Setting up engagement points
We will start with setting up Points of Engagement (POE). These can be interpreted as different points within a store. For example: a promotion display and a spot on the regular shelves.
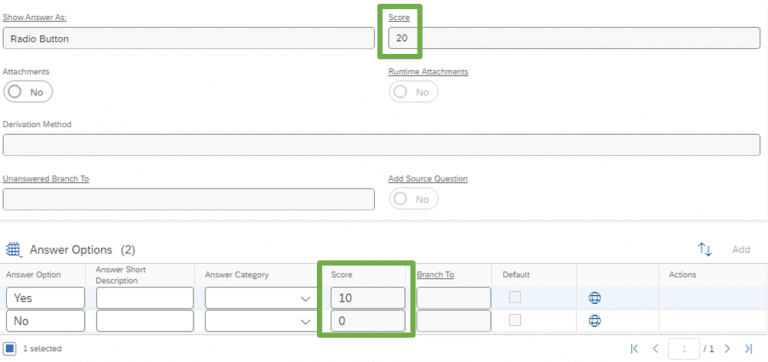
You will have to start with creating a new POE and choosing a suitable name (optionally assign it to a product, this can also be done in surveys). After opening the newly created POE, the first tab that shows is: Surveys. These are the most important for a Perfect Store setup, as surveys give the most functionality in analytics. On the survey screen you can add one or multiple surveys, these can be made optional or mandatory for the sales rep. If you want to use scoring in the Perfect Store, it is important to maintain scores within the surveys. For each question relevant for scoring both the answers and the question should contain scores.
If you want to use KPI`s we recommend to also link the survey(s) to products.
It is also possible to select specific questions for a point of engagement. You can use the tab “Questions” for this. There you can add questions from the Question Bank. If these questions are relevant for scoring you should mark the box and manually enter the score and weightage. The weightage must always add up to 100%.
If it is relevant that the sales rep performs optional or mandatory tasks during his visit, you can add them to the POE. If required, the POE can be linked to sales organisations. Finally, you can add attachments if the previous options were not sufficient. The last tab “engagement Maps” will be empty for now. This tab will show all the maps that this POE is linked to (how is explained in the next part).
After setting up all of the above you can save the POE. Once saved, go to actions and perform a consistency check. If the POE is consistent and you are sure everything is filled in correctly you can activate the POE in the actions dropdown menu.
If a store has multiple Points of Engagement (shelves/displays) for your product, you should perform the previous steps for every one of them.
If one POE is applicable to multiple products you can assign multiple products to it via surveys on the product tab. You can also create multiple POE`s if this is preferred.
Once all POE`s are configured we can continue with the engagement maps.
Configuring Engagement Maps
In the engagement map you will combine the points of engagement. An engagement is often made for one store or one retail chain.
We start by creating a new engagement map, this is divided in four steps.

In the first step we recommend describing as clearly as possible which store / chain this map applies to. This will help to keep the overview clear once you start adding more maps. Furthermore, in this screen you can choose a scale, this will set the max value a store can get. E.g., if you set the scale to 10 and a store gets 71% of the total points it will get a 7. The higher the scale the more detailed the end score will be. You can then choose the threshold for scoring and give a description (up to 3 ranges). These thresholds will be used to colour code the scores.
In the second screen you can add the previous created POE`s or you can create a new one from here. Start by adding all POE`s relevant for this store / chain (Engagement Map). You should also set the order in which the POE will be presented to the sales reps. If you don’t have a store-layout file with the location of the POE embedded: mark the box in column “deactivate indicator”. If you have a layout file you can use this to map the POE`s, these will then be shown with indicators to the sales rep. You can upload the layout once the four steps are completed.
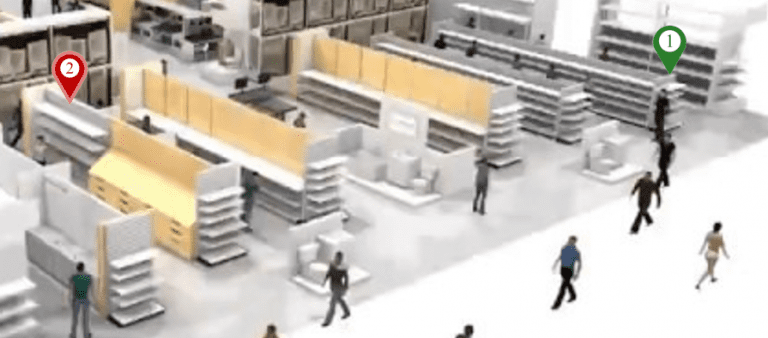
POE indicators show where in the store you can find the POE`s.
If the importance of the POE`s is different you can give a weightage here for each POE, else you can click the equalize weight button. Again, the total amount of the weightage should add up to 100%.
In the third screen you will assign the engagement map to customers. This can be done by adding specific customers (including hierarchies) or by adding target groups.
The final screen will enable you the create Advanced and Simple KPI`s. Currently this is only possible for product related questions. These KPI`s can use their own scoring logic and are useful to create some extra insights.
Once the map is created you can go to the attachments to add a store layout. This can be done by clicking add – local file – uploading a file and choosing the type “store layout”. In this layout you can point out where the different POE`s are in the store.
After performing these steps, the engagement map is ready. You can open the map and check if everything is entered correctly. Then choose the action consistency check, if the map is consistent and everything is entered correctly you can activate the map.
Perfect store engagement maps and POE`s use versioning, once a map is in use a new version is required if you want to make changes.
Once the engagement map is set up you need to enable “Perfect Store” as an option for visits.
There are two approaches to this.
1. Enable the Perfect Store visits slider via adaptation in the visit quick create screen.
or
2. Go to Business configuration > Maintain Visit Types and add a type and mark the “default Perfect Store” box. Visit type should then also be available in the visit quick create screen.
Once this is enabled the perfect store visit are ready for the use by the sales reps.
Perfect store for a sales rep.
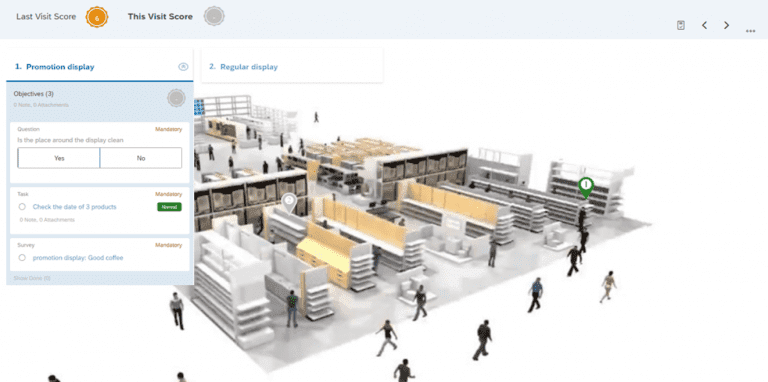
When a sales rep creates a Perfect Store visit, the engagement map will be determined based on the account filled in on the visit. Once the visit is opened, the perfect store tab will be visible (surveys and task will automatically be hidden). When the employee clicks “Start perfect store execution”, a new screen opens:

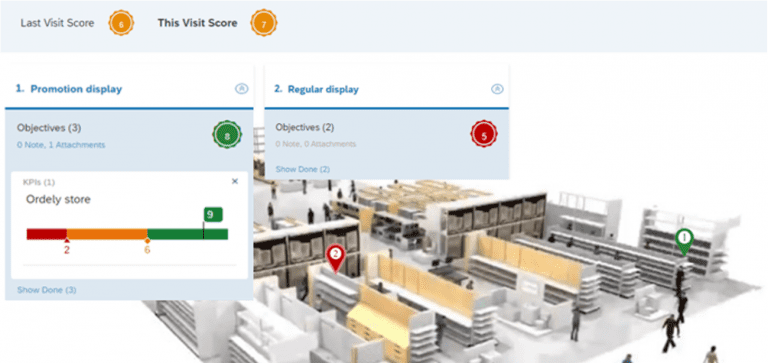
All POE`s are displayed here and if a store layout was uploaded this will also be displayed. If a previous perfect store visit was performed for this account, the previous score is also displayed.
The sales rep can now answer all questions in the POE`s. If multiple products are linked, answer the questions per product, or even add a product manually if this is needed.

Once the full list of tasks and questions is completed the sales rep can click on the empty score to start the calculation of the end score and all POE`s.
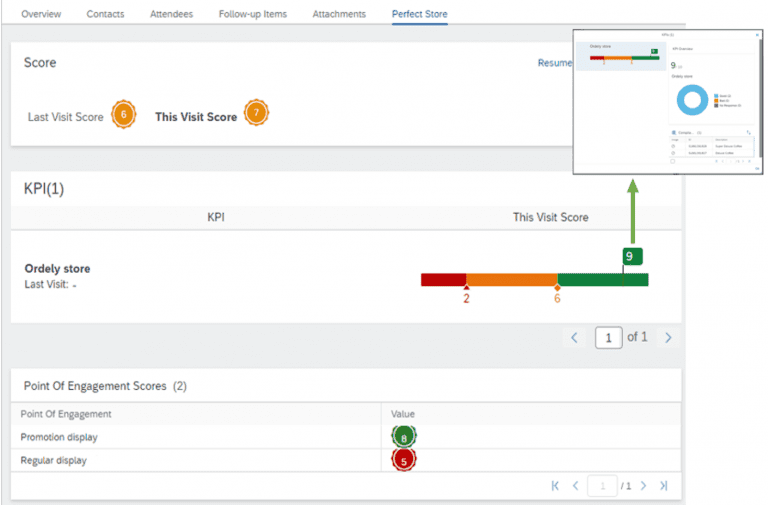
The employee can then see the score per POE (including KPI`s) and the total score. The total score of the last visits will be displayed next to the score of this visit to help the sales rep indicate if the store is improving.
All this data can also be seen on the perfect store tab. This overview allows for KPI drilldown as well.
This concludes setting up the Perfect Store and displaying how sales reps would use it.
Conclusion
Creating a personalized touch for each visit is within the standard capabilities of SAP Sales Cloud. I hope this information can help you in speeding up implementing this feature or convince you to investigate how it can be implemented in your company.
Receive our weekly blog by email?
Subscribe here:

