
Pieter Rijlaarsdam
Read all my blogsAdding a custom assignment block on the SAP CRM Webclient home page
Pieter Rijlaarsdam, 17 July 2013
 Once the CRM Webclient is started, it automatically displays the home screen. This screen gives the user specific information, such as “Saved searches”, “Alerts” and “Appointments”. Within project developments it might be interesting to enhance the home screen with an additional assignment block, for example, to inform the user about opportunities that need his attention.
This blog given an overview of the actions that need to be executed, to enhance the CRM Webclient home screen and add an additional assignment block.
Note that it is especially important to think about the performance of the selection behind the additional view. As the user cannot influence the selection and as we are talking about the homepage, the last thing you want is your users waiting for the homepage to load because the selection of your custom view is too expensive.
Create a custom view
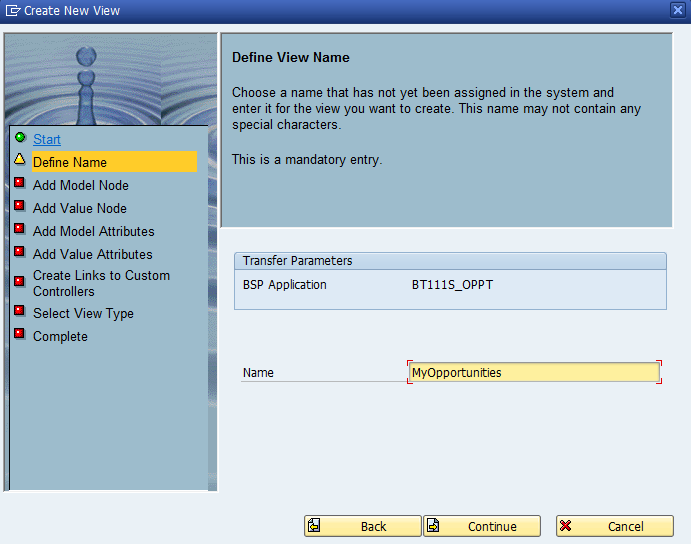
In our example we want to inform the user about his opportunities. For that we will create a new view within SAP’s standard UI Component “BT111S_OPPT”. To do so enhance UI component “BT111S_OPPT” and create a new view called “MyOpportunities”.
Include a model node called “Result” referring to the standard BOL entity “BTQROpp”, used to store query results for opportunities.

Now that we created the view, we could implement controller method “DO_INIT_CONTEXT”, to execute a query to our specific needs, searching for opportunities for the current system user, and fill context node “Result” accordingly.
For an example refer to UI component “CRMCMP_GS_WC”, view “TodaysApptmnt”, which SAP uses to display assignment block “My Appointments Today” on the home screen.
Create an interface view to expose a component window
Once you have create a custom view and decided that it needs to be visible on the home screen, first thing we need to do is expose this view to other components, so it can be used somewhere else.
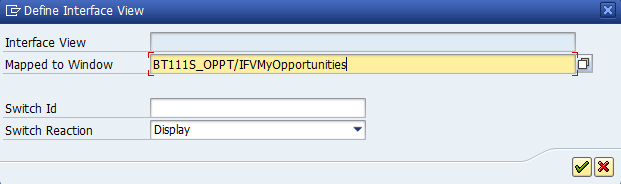
Most likely your view is part of a window already. We need to create a component interface for this window. To do so, go to the “Runtime repository editor” of your component and create a new “Interface view”.

Select the required window and continue.
Incorporate the interface view within the home page component
Now that we exposed our window to other components, we need to enhance the CRM Webclient home screen to incorporate the exposed window.
To do so, enhance UI component “WCC_SLS_HOME”, go to the “Runtime repository editor” and add a “Component usage”.
Enter an “ID”, select the required “Component” and “Interface view” and continue.
Add the incorporated view to the default window
We incorporated the view within the CRM UI Webclient home page component, so next step is to add this view to the default window. This will allow us to select the view within the configuration of the home page.
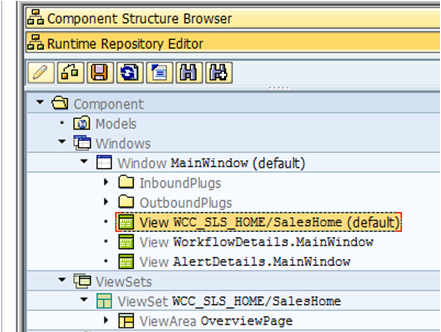
Go to the “Runtime repository editor”. As we can see, there is only one window, containing a view set “SalesHome”. That’s where we need to add our view.
Select the viewarea “OverviewPage” and add a view.
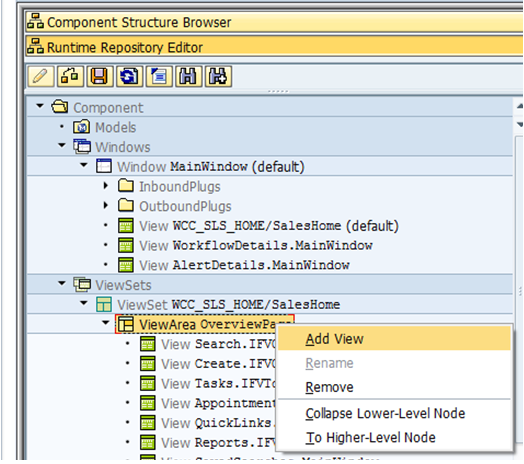
Search for the view that we incorporated and continue.

Our view has been successfully added to the home page. Once you have changed the UI configuration, the view will be displayed automatically on the home page.
Conclusion
It’s quite easy to incorporate an existing view of a component into the CRM UI Webclient home page. Adding information to the home page could increase the user’s experience and will allow them to work more efficiently. It’s up to you to determine what kind of information the users need.
Receive our weekly blog by email?
Subscribe here:


