
Olaf Pohlmann
Read all my blogsThe SAP Cloud for Customer system is equipped with an OData service layer which is great for reading or modifying entities from outside the system using the standard OData protocol. But besides working on individual attributes, another option exists which works on a piece of (custom built) functionality. It is called OData functions and in this blog I will explain how to use these.
When to use
In SAP Cloud for Customer, a common way to trigger custom built functionality is from workflow rules. With workflow rules you can trigger actions that a developer has built. One scenario in which I have used OData functions was for a workflow rule that didn’t execute for a set of tickets because of a temporary configuration problem. To be able to correct this situation, I created a new OData function and triggered the action manually for these tickets. The big advantage lies in the fact that exactly the same logic is triggered again and that I don’t have to adjust individual attributes.
Custom development
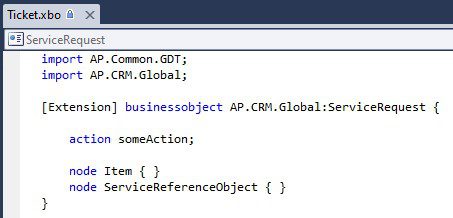
Below is an example of a custom piece of development that has been made using the SAP Cloud Applications Studio (the development tool for SAP Cloud for Customer). This development introduces a new action called “someAction” on a ServiceRequest (ticket) which, for this demo, changes only the subject of the ticket. But because this coding resides in the SAP Cloud for Customer system, it can just as easily read or modify attributes of the related customer or employee of this ticket. Even attributes that are not exposed in OData services can be accessed.

Expose the functionality
To expose this custom functionality we are going to add a new OData service by following these steps:
- Log on to the SAP Cloud for Customer system
- Navigate to Administrator » OData Service Explorer
- Select view “Customer OData Services”
- Create a new OData service and give it a name (“demo” in my case)
- In the header section enter a Work Center View to set authorization for this service (e.g. SEOD_TICKET_SADL_WCVIEW since this demo concerns tickets)
- Under “Entity Types” use option “Select Business Object” to select business object ServiceRequest and node Root
- After that tick the checkbox of the Root-node
It should look like this:

Now switch from “Entity Types” to “Function Imports” and select the following:
- Function Import Type: ACTION
- Entity Name: ServiceRequest
- BO Action / Query: someAction
Name is automatically filled (but can be changed) and is important to remember to make the call later on. In this demo I will use the proposed name. Now the newly defined function is shown:

The parameter interface of this function consists of:
- One import parameter ObjectID; this is the unique technical identifier of a ticket
- One returning parameter; you can choose between ServiceRequestCollection or just an indicator called IsSuccessful
Activate and we are ready to test.
Time to execute
First we need the technical key of a ticket. This can be retrieved by this standard OData call based on ticket ID. Replace {{demo}} with the specific URL of your SAP Cloud for Customer system.
![]()

The result contains the technical key we need. Now everything is in place to make the function call. Note that when using a regular business user this call should include a CSRF Token. This does not apply when the call is made using a integration (technical) user, more details here.
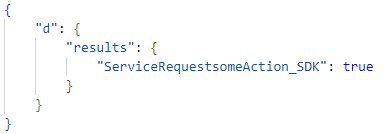
The function is executed with a POST-request and by filling in the technical key of the ticket. The URL is somewhat different because it concerns custom development and it includes the path to the newly created OData service “cust/v1/demo” and the new function named “ServiceRequestsomeAction_SDK”.
![]()
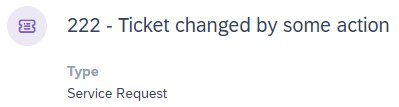
The result suggests everything went okay but let’s also check the result in the SAP Cloud for Customer system. When I open the ticket, I see indeed that the subject has been changed:
Hopefully you get an idea of the potential of OData functions and how they can help in exposing custom built functionality.

Receive our weekly blog by email?
Subscribe here:

